67P/Churyumov-Gerasimenko. A Single Body That’s Been Stretched- Part 42
THE IMHOTEP CRUST SLIDE- INITIAL OVERVIEW 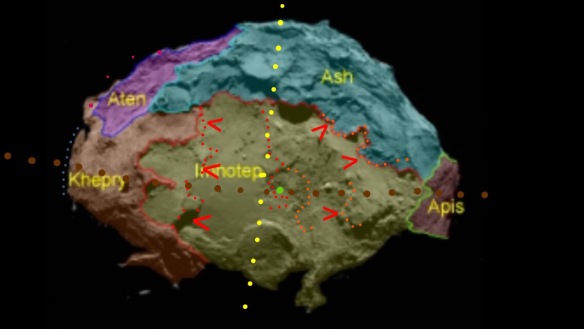

This photo shows the large-scale crust slide vectors at Imhotep. It shows the red slide to the left of the comet’s yellow short axis and the orange slide to the right of the axis. The red and orange slides involve a lower layer of crust, one ‘onion layer’ below the former surface onion layer layer. These header photos are reproduced further below, with their keys and a detailed explanation.
Photo 2
 The
same photo as above but with the predominantly up and down blue crust
slides added. The blue slide involved mostly the top onion layer of
crust.
The
same photo as above but with the predominantly up and down blue crust
slides added. The blue slide involved mostly the top onion layer of
crust.
Photo 3 
The same photo as above but with the extra green slides added. The green slides were those that slid on further than the extent of the red and orange slides after riding on them and delaminating from them when they stopped.

The same photo as above but with the extra green slides added. The green slides were those that slid on further than the extent of the red and orange slides after riding on them and delaminating from them when they stopped.
Photo 4

The depression (blue dots), a site of outgassing and slurry effusion, along with the gravitational low point of Imhotep (green).
INTRODUCTION
The
depression on Imhotep shows obvious signatures of catastrophic
outgassing and slurry effusion and it straddles the paleo rotation plane
(Part 26). The lowest point of the depression is plumb on the paleo
rotation plane and is also at the intersection of the long and short
axes of the diamond-shaped body. It’s in the middle of the lowest of the
three flash-frozen slurry lakes in the depression.
The
depression’s location, right in the middle of the diamond, which
according to stretch theory would be stretching along its long axis,
means the depression is a prime candidate for being the focus of the
initial crust-tearing event. The crust tore from this point before it
slid across the base of the comet. The comet would be stretching due to
spin-up via asymmetrical outgassing. The slide mechanics would be
similar to the slides at Babi, Seth and the south pole (Parts 38-40 for
Babi/Seth and Part 30 for the south pole).
Stretch
theory strongly implies liquids under the crust, in the core.
Conventional cometary theory doesn’t allow liquids due to modelled
temperature and pressure scenarios. Although stretch theory implies
slurry, it doesn’t depend on slurry for validation. The copious
head-body matches throughout this blog are the validation. They prove
that the head was once attached to the body and so, by definition, has
stretched to its current position on a stretching neck. This simple
proof led to evidence for the single body stretching before shearing,
then evidence of the paleo rotation plane and on to crust sliding at
Babi, Seth, Ma’at and the south pole. So crust slides at Imhotep are
simply a continuation of the expected behaviour of this comet under
spin-up and stretch.
Slurry
would be liquids (either water or hydrocarbons) mixed with refractory
material like dust. Slurry signatures are to be found in abundance
everywhere where stretch theory points to shearing, slab loss and crust
sliding. It suggests that exposing the lower ‘onion’ layers releases
liquids that were previously pent up under or between those layers. To
be clear, the shearing, slab loss and crust sliding were all identified
via matches in the previous 41 parts of this blog and only after they
were established did the slurry signatures become apparent. The slurry
signatures were therefore an independent corroboration of the matches.
The same applies to Imhotep and the depression, except this time the
penny finally dropped- I was able to find the last two pieces of slid
crust by noticing the form they had left on the slurry and circles in
the depression.
A SCENARIO FOR IMHOTEP
If
you were to picture the most ideal crust-sliding scenario on the base
of the comet, the pieces would slide away in pie shapes with their tips
all kissing the central point of long- and short-axis intersection.
Their
initial detachment would cause a fissure to open up in that highly
concentrated area of tearing. The initial fissure would be at dead
centre of the diamond-shaped base because the stretching forces
(predominantly along the long axis) would operate in tension either side
of that central point just like a tug of war. If any crust was going to
give way, it would be most likely to do so at the centre. That would be
like the tug of war rope snapping in between the two teams rather than
halfway along one team’s stretch where the tension in the rope is less.
The
initial fissure from the initial, central tear would become today’s
lowest point. If the fissure was two onion layers deep, it would be very
deep. And, if there were liquids in the interior, they would gush from
the fissure due to sudden exposure to the vacuum. This would be similar
to a boiler flash when a boiler is punctured. The formerly pressurised
water flashes to vapour violently as the pressure drops but not
necessarily all of it right away. Some liquid is carried off in the
explosion so you have a mixture of gas and liquid being ejected. But all
of the liquid vapourises as it’s carried away. The technical term is a
BLEVE:
If,
as in the case of the comet, the water is mixed with dust and general
refractory material, it would be slurry by definition. When all the
water did eventually evaporate away through the slurry due to the zero,
vacuum pressure, it would leave behind the silty dust as a flash-frozen
lake bed. If the lake was deep enough, some water might flash freeze at
depth and perhaps gradually sublimate away over time, through the
overlying layers and in the conventional manner.
The
exiting of gas and slurry from the initial fissure would scour the
feeder dyke wider and so deepen the fissure, which is why it would
likely become the deepest point in the depression once the slide event
was over.
The
slurry would well up and over the surface of the comet where it could
but if the flow was too high for the width of the fissure to allow
escape, it would also force its way under the loosened crust pieces that
were on the verge of sliding away for good. It would follow weak spots
to form collateral dykes under the crust until collateral, vertical
fissures were found nearby.
This
would especially be the case if the depression had an upper, circular
lid of crust and the pie-shaped pieces were actually a second layer of
crust sitting under it. That is, the upper lid had loosened enough to
allow a drastic drop in pressure underneath but while possibly floating
on the emerging slurry it was forcing the flow further down to move
laterally through the second fracture plane down.
The
lid would eventually slide (or even float) away across the surface of
the comet, pulled by a small arm of attached crust which was itself
sliding due to stretch. This would expose the second layer down
consisting of the notional pie shapes that were kissing at the middle of
the depression and now free to pull further apart. The collateral
fissures opening up close to the initial fissure would widen into
noticeable cracks due to continuing stretch. They would reach perhaps
80-100 metres wide. This would allow the slurry to expel its gases at
the base of the cracks, on exposure to the vacuum. The gas being
expelled would be the formerly described liquid flashing to gas or
BLEVEing. These wide cracks would leave a signature of their existence
after the crust pieces had eventually slid away. It would be in the form
of 100-metre-wide lines of flash-frozen slurry residue (the dust and
refractory material). The lines would exhibit circles where gas was
forced through the slurry. In fact there would be so many circles, some
overlapping, that they would in effect be 100-metre-wide lines of
circles:
Photo 5 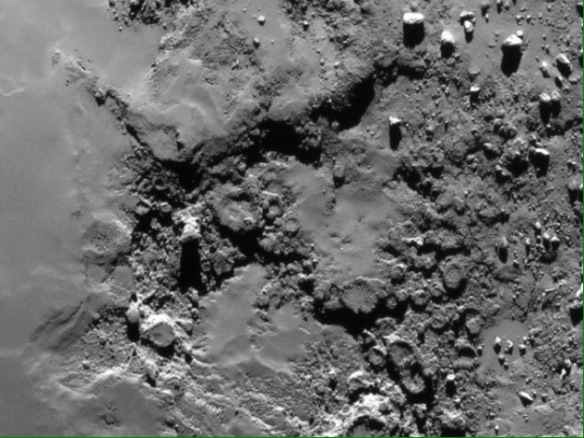
Credit: ESA/Rosetta/MPS for OSIRIS Team MPS/UPD/LAM/IAA/SSO/INTA/UPM/DASP/IDA

Credit: ESA/Rosetta/MPS for OSIRIS Team MPS/UPD/LAM/IAA/SSO/INTA/UPM/DASP/IDA
Furthermore,
the areas where the crust had been sitting on the slurry, next to the
cracks, would exhibit flat layers of flash-frozen slurry residue because
the gases couldn’t escape- except that on closer inspection, you might
see some smudged circles which would suggest that some lesser amount of
gas was indeed being forced out and through the porous crust. These
circles would be almost indiscernible due to the crust sliding away over
the top of the slurry and smudging it. But it would slide away from the
wide cracks, not over them, and therefore away from the undisturbed
circles at the base of the cracks. The tracks of flash-frozen circles
would be imprinted in the depression, betraying the puzzle-fit pattern
of the slid crust. It would then just be a question of finding those
shapes hundreds of metres away along the expected slide vectors as
predicted by stretch theory. And then checking them by reversing the
slide.
Since the entire process was liquid-driven, the resulting depression, though frozen and dry today, would have the uncanny appearance of a muddy water-hole.
Since the entire process was liquid-driven, the resulting depression, though frozen and dry today, would have the uncanny appearance of a muddy water-hole.
Everything we see in the depression and across Imhotep is consistent with this narrative.
THE PHOTOS
The
rest of this post is predominantly one long, narrative key to the
header photos. It starts after the ‘key’ heading below. The first three
header photos build up annotations so the third one has all the
annotations from the first two. This third photo is reproduced before
each of the key colour headings in the key so as to make it easier to
scroll up (or down) and check the description against the photo.
Contrary to other posts the references to up, down, left, right refer to those literal directions in the header photos.
The
crust slide matches for the base of the comet are numerous and fairly
complex. This post is an overview so no matches are proven. They will be
proven in the most intricate detail in due course. The reason for an
overview is because we need to see how the slide geometry is intimately
related to the paleo rotation plane of the comet (which is the long axis
of the diamond-shaped base) and to the mirror line of sliding symmetry
(the short axis). In other words, the crust sliding is related to comet
spin-up and stretch.
Some
Imhotep slide matches have already been documented, without any
narrative. They’re in the dedicated Imhotep slide matches page which is
accessible in the menu bar above. The matches there are just an ad hoc
jumble at the moment and only a small proportion of the total. They
appear to have no linking narrative. This overview post will flesh out
the narrative. Subsequent posts will insert those ad hoc matches and
others into that narrative.
A
hat-tip is owed to commenter Henrik on the Rosetta blog, who noticed
that the big circular pancake at the bottom of the header photos matched
to the depression in the middle of Imhotep. That got the slide matches
started for the rest of Imhotep. The post on which he commented is here:
For
those readers who are familiar with the missing slabs and are wondering
what this crust-sliding means for the missing Imhotep slab, there’s a
sub-heading at the bottom that discusses this.
KEY TO HEADER PHOTOS 
BROWN

BROWN
The
paleo rotation plane (which is also the long axis of the diamond-shaped
body). Please see the page in the menu bar regarding a small adjustment
in its line. It’s a ~3° adjustment towards the current plane. The
current plane runs from the same point on the right to a point on the
left where it just clips the end of the mauve area below the name
‘Aten’. So the paleo plane is now more like 10-12° off the current one
whereas before it was said to be at least 15° off. The reason there’s no
adjustment on the right end is because that is Apis which is at long
axis tip and the rotation plane precessed about the long axis- the
neatest expected option. Thus, the lines of the two planes cross each
other at both of the long axis tips/extremities. The other crossing
point is at the top of the Hatmehit cliff, in the middle of the V-shaped
Hatmehit slab hinge. The paleo plane isn’t just a wild speculation
though it is a hypothesis, based on the ten paleo plane stretch
signatures in Part 26 that all line up round the comet (now extended to
thirteen in the new page). 
YELLOW

YELLOW
The
short axis of the diamond shape, as best it can be discerned given the
winter shadowing at the bottom of the frame. It acts as a line of
symmetry for the sliding crust, which tore from the line and slid in
opposite directions. 
BRIGHT GREEN

BRIGHT GREEN
The gravitational low of Imhotep as identified in this OSIRIS team paper by A.T. Augur et al. (pay walled):
The paper is discussed in the following Rosetta blog post although the relevant figure with the gravitational low isn’t shown:
Notice
how the gravitational low is almost exactly at the intersection of the
two axes and therefore at the centre of the body lobe’s diamond-shaped
base. It’s also the focus of what appears to have been a very
substantial amount of outgassing and slurry ejection. It’s near the
centre of a marked depression that exhibits geyser-like circular
features and flash-frozen slurry lakes. The depression is dotted light
blue in the fourth version of the header photo.
The
circular features and lakes are described in the linked paper and blog
post above and referred to there as gas dykes and dust respectively.
They don’t mention slurry because liquids are not accepted as being
viable in the temperature/pressure environments of current comet
models.
We’ll
come to see in the next few posts that all the sliding crust pieces
were centred on the depression and slid away from it. If you reversed
the slide, they would all kiss inside or along the edge of the
depression and do so with a remarkable puzzle-fit affinity.
RED

RED
This
is the line of one of the two main rifts across Imhotep. It involved
the lower of the two ‘onion layers’ of strata and it tore from along a
line that is almost contiguous with the yellow short axis line. The
right hand red line is the tear line and the left hand one is where that
torn edge slid to. That’s why they run parallel with similar bumps and
kinks. This lower layer slid away at 90° to the left of the short axis,
hence its final position running parallel to the short axis as well as
its tear line.
The red slide is around 800-900 metres, consistent with the crust slide distances elsewhere on the comet.
The
upper of the two layers slid predominantly at 90° to the lower layer
i.e. parallel to the short axis (see the blue lines in the photo and
described below in the key). The upper layer slid up to the top and down
to the bottom. So when you couple this with the red slide, it’s the
reason why the flat Imhotep plain has a long, rectangular shape that is
parallel to the diamond’s short axis and exactly straddles the long
axis. 
ORANGE

ORANGE
This
is the notional mirror image to the red tear and slide. It also
involves the lower onion layer. It’s not the same shape as the red
rectangle and it involved more obvious radial sliding than the red slide
on the other side of the yellow short axis. That’s why it’s said to be a
notional mirror image: topologically speaking, it’s executing the same
sliding behaviour in the opposite direction, with the yellow line acting
as the line of symmetry. It looks a lot messier than the red side but
when the radial nature of the slide is borne in mind, it too will be
seen to be tearing from along the short axis albeit a little displaced
to the right of it. As with the red slide, the orange slide involves the
lower of the two crust layers but it’s sliding to the right of the
yellow line. And separately, the top layer slid both up to the top and
down to the bottom (as stated above, the top layer is the blue slide-
see blue key further down).
There
are three orange lines. The one at the left, towards the yellow axis
symmetry line is the tear line. It’s entirely within the depression. The
two detached, right hand and upper-right orange lines match to the tear
line. They are much longer than the tear line. This is because when
reversing the slide, the slid matches nest over each other in order to
fit to the tear line. That’s another way of saying they slid radially:
if they slide back in reverse they’re constrained to stack over each
other. This isn’t a general assumption, the individual sections will be
matched to their stacked seating points in an upcoming post.
The
red slide to the left of the yellow line doesn’t exhibit the same
radial stacking behaviour as the orange slide when looked at in
isolation- it’s a simple shunt of a notionally straight section of lower
layer across the Imhotep plain. However, that changes when you add in
the top layer. The current rectangle is deceptive because rectangles
don’t usually chime with radial processes. However, the fact that the
lower layer slid one way to the left and the upper layer slid at 90°, up
and down, is the beginnings of radial behaviour. And yes, they have to
nest back over each other in the reverse slide in order to become two
layers, one on top of the other. If you add in the green delaminations
(see below) the red/green slide on the left is essentially a radial
sliding process, the same as on the right. That’s despite leaving such a
neat rectangle. The orange slide also has up/down, top layer blue
slides nesting over it if you reverse the slide. So both sides of the
yellow symmetry line exhibited radial sliding, the only difference being
that on the orange side, the radial behaviour occurred within that
lower layer as well as in its interaction with the top layer. 
BLUE

BLUE
The blue slides are the up/down slides of predominantly top layer crust. They slid over the layer below and at 90° to it.
The
blue circle with a red slide arrow in the middle is the circular
pancake that Henrik suggested was formerly sitting in the depression.
The small green dot corresponds to the green ‘low point’ dot in the
depression and would have been sitting directly over it. It’s difficult
to draw a line it slid from because a) it’s a notional circle, not a
line- its seating circle is the depression itself and b) the depression
is already cluttered with dots. So this smaller green dot substitutes as
a fiduciary point linking to the larger green dot from which the
pancake slid. There was almost no rotation so a single dot suffices.
We’ll see in an upcoming part that neither the pancake nor the
depression is really a circle but they are the same shape and size.
Just
to avert any confusion if you read Henrik’s comment, linked above: he
thought the pancake had rotated 180°. Mini matches will show that it
didn’t and that it was an almost straight translational slide with a
maximum 3-5° rotation. However, this doesn’t detract from the initial
observation that there was possibly some sort of match. Sometimes it’s
other characteristics you are seeing but can’t quite quantify that are
directing you towards further investigation. That investigation, via
mini matches, is required to validate or discard the match. This firms
everything up but often delivers a few adjustments or surprises in the
process. In this case, it showed that there was almost no rotation.
On
further study of the matches as a result of Henrik’s suggestion it
became apparent that another, lower layer had slid out of the depression
i.e. from underneath the pancake. Those are the red and orange slides
described above and they presumably departed after the pancake slid
downwards. The pancake is therefore part of the upper layer of crust on
the right hand side of the yellow, short axis symmetry line and it used
to sit on top of the lower sections that nested together in the
depression. It’s the lid of the depression, if you like, and for that
reason, it’s the same shape and size as the depression. As such, it
chimes with the lid described in the ideal stretch and slide scenario at
the top of this post.
The
blue line that’s seemingly attached to the pancake is a presumed
section of sliding crust but it has no match and almost certainly isn’t
attached to the pancake in any substantive way. Close ups show the join
apparently draped with dust or, as this blog would say, ‘welded’ with
frozen slurry because the pancake is already half-covered in slurry. But
that doesn’t mean they’re structurally linked at all and the strength
of the weld would be virtually non-existent. The reason this small,
straight section is thought to be a slide towards the bottom, along with
the pancake, is that larger, parallel sections of crust are to be found
lower down in what is shadow in the header photos. They will emerge
from the shadows when the detailed matching is being done in later
parts. This short blue line bounds the bottom edge of the rectangle and
appears to be a lower section of crust. That’s in contrast to the large
section of top crust about to be described, that slid upwards. This
means the up and down slides don’t actually involve top layer crust all
the way along their perimeters. This small section seems to buck the
trend while the pancake to its right is a top layer of crust along with
the whole section marked blue along the top of the frame. So
three-quarters of the up and down slides are top crust and one quarter
is possibly or probably second layer.
The
uppermost blue line is the border of a large section of top crust that
includes the large circle traversed by the yellow line and it extends
all the way across to the ‘Ash’ name. It slid upwards from the blue line
below it. That lower line runs along the edge of the depression and
then curves round to run upwards, almost contiguously with the red
line. 
GREEN

GREEN
The
green-dotted lines are sections of delaminated crust that slid further
on from the classic red slide and orange slide boundaries. They Have
green slide arrows too, showing their direction of slide, but the slide
vector is in relation to the layer they have delaminated from.
The
left hand and upper-right green lines delaminated in the same direction
as the layer they delaminated from. Their arrows therefore follow the
same direction as the main slide and look intuitively correct.
The
top-left green line, or rather, green area delaminated at 90° to the
layer below it, rather like the upper layer that slid towards the top of
the frame. The circle within the green area slid from the notionally
circular area where its green slide arrow is placed. And the rest of the
green area slid with the circle within the green area. However, if you
add the green arrow (90°) slide vector to the classic leftward slide
vector of the layer below (red slide; red arrow) you can see that as the
main slide was moving left across Imhotep, the green area was moving
both leftwards and up. In other words, when the two slide vectors are
added, the green area slid at a 45° angle from the big bright green dot
in the depression. To be precise, the bottom-right green dot of the
green area used to kiss the slightly brighter small patch to the
above-left of the big green dot in the depression. That’s the patch that
touches a red dot.
Despite
sliding up at 90° like the top layer, the green area slide is part of
the lower layer. It originally sat under the blue slide chunk of top
layer that’s now situated to its right. There’s a little more to the
green area delaminations and slide vectors which will be presented in
greater detail in due course. But in brief, appears the green area was
originally attached to the left hand green slide (see below) which means
its 90° slide was even longer and involved an extra mini-delamination.
The evidence for all this movement will be in the form of highly refined
mini matches and signatures all along the slide itself. Ice signatures
will also be seen to match.
The
left hand green slide is also an extra slide beyond where the red slide
stopped. The tip of the finger-like protrusion nests to the brown dot
that’s to the right of the big green dot in the depression. It looks as
though the green line of this slide should continue curving round beyond
the topmost green dot and touch the left hand red line to make a neat
mirror image of the two horseshoe shapes. However, it appears that the
topmost green dot slid from the red line, specifically, the top of the
red line’s kink above the ‘m’ of Imhotep. If you reverse the green
slide, it means the finger is shoved a long way to the right of the red
line as is the bottom section or horseshoe. That allows the finger to
kiss its brown dot in the depression if we slide the two nested layers,
red and green, back in unison across the flat plain. It also allows the
bottom half of the bottom horseshoe to be far to the right past the red
slide line as well. This places it far enough to the right to be just
beyond the tip of the finger. That’s far enough for it to wrap round the
bottom perimeter of the pancake (when the pancake was in the
depression). This bottom half of horseshoe is the same shape and size as
the bottom perimeter of the pancake, although it doesn’t look to be in
this grainy overview.
Most
of this left hand green slide appears to be top crust except for the
majority of the finger which looks scalped. That’s to be expected
because of course the finger sat in the depression under the pancake.
The the finger betrays an ice signature along its upper edge as does a
small lump in the depression along that upper edge of the finger’s
seating line (it’s either the brighter patch mentioned above or under
the red dot next to it). You may recall that the bright patch in the
depression is where the upper left, green area kissed. This means both
green slides kissed each other in the depression. They will be shown to
kiss via the matches anyway but they also match on their ice signatures.
That corner of the green area that kissed the bright patch has its own
very strong ice signature too. And it is only that corner that is
matched to the depression. The rest sat outside, along the depression’s
edge. So the only two parts of the green slides that sat in the
depression have ice signatures and the place where they sat in the
depression also has an ice signature. Moreover, apart from strewn
boulders with faint signatures, these are three of the four main ice
signatures to be found anywhere on Imhotep. Seeing as the green slides
are already matched to the depression via mini matches, the accompanying
ice signature match would be an amazing coincidence if it had happened
by pure chance.
The
majority of the strewn boulders with faint ice signatures actually
trace the line of the top-left green slide. They form two lines across
the flat plane at the aforementioned 45° slide vector. The two lines
start at either end of the seating match already made alongside the
depression. They continue uninterrupted until they reach either end of
that uncanny-looking rectangle within the top-left green area, the one
that looks like a wide ski ramp. It was this rectangle, overhanging the
red slide it was piggybacking on, that distributed the icy boulders from
both its ends. Because it was moving across the plain at 45°, it
distributed the two signature lines at 45°.
The ice signatures will be explained in more detail with a linked OSIRIS scientific paper.
The
top-right green slide appears to be the top crust layer that slid on
past the classic, orange bottom layer. It slid in the characteristic
radial orange slide manner. 
FUCHSIA
The four fuchsia dots at top left are the four slid cuboids from Part 40. We are looking up at their undersides because we’re looking at the base of the comet. They are simply shown here for context and are irrelevant to the Imhotep crust slides.
SLATE BLUE
This is the left hand tip of the body lobe diamond shape. It denotes the true flattened diamond tip. It’s the very defined rim in Khepry where it turns sharply to become the base. It runs along a sharp ridge which is the width of Khepry. At first glance, it looks as if the flattened tip should be wider but the section at the top (not dotted slate blue) is one of the Babi cuboids that’s set back somewhat. The true, slate blue line makes this flattened tip satisfyingly similar in length to the opposite flattened tip at Apis. Both are equal length sections of residual crust that appear to have modified the stretching tip in an identical manner at both ends. The only difference is that Khepry extends upwards to join Aker and together they form a noticeable bow to the body diamond that is the width of the flattened tip all the way up. At the Apis end the width of the flattened tip is the length of the small lozenge that is Apis.

FUCHSIA
The four fuchsia dots at top left are the four slid cuboids from Part 40. We are looking up at their undersides because we’re looking at the base of the comet. They are simply shown here for context and are irrelevant to the Imhotep crust slides.

SLATE BLUE
This is the left hand tip of the body lobe diamond shape. It denotes the true flattened diamond tip. It’s the very defined rim in Khepry where it turns sharply to become the base. It runs along a sharp ridge which is the width of Khepry. At first glance, it looks as if the flattened tip should be wider but the section at the top (not dotted slate blue) is one of the Babi cuboids that’s set back somewhat. The true, slate blue line makes this flattened tip satisfyingly similar in length to the opposite flattened tip at Apis. Both are equal length sections of residual crust that appear to have modified the stretching tip in an identical manner at both ends. The only difference is that Khepry extends upwards to join Aker and together they form a noticeable bow to the body diamond that is the width of the flattened tip all the way up. At the Apis end the width of the flattened tip is the length of the small lozenge that is Apis.
The
two tips are the least disturbed parts of crust on the comet. Every
other region has suffered upheaval of one sort or another. Whilst Khepry
may be scalped slightly, I suspect that Apis is pristine crust or at
least pre-stretch crust insofar as stretch theory explains its
morphology. For that reason, the Rosetta team could do no worse than to
study Apis more intently than the rest of the comet. Since Rosetta went
there to decipher the secrets of its formation, this tiny area may give
up those secrets as it is probably the oldest feature on the comet.
CONCLUSION
The
Imhotep slide matches will take a few posts. There are still a number
of posts to come regarding the crust slide on the head lobe at Ma’at
(the section of Ma’at that’s to the right of the cove) and delaminations
along the shear line at Hapi below it. However, Parts 31-41 explain
these same mechanisms for the adjacent section of Ma’at (to the left of
the cove) and shear line below that section at Babi. The sewing up of
the right hand area with five or six more posts, whilst very
interesting, is more of a formality. Imhotep seems more important for
the time being.
MARCO PARIGI’S BLOG
Marco
Parigi has a stretch theory blog as well. It describes many of the
aspects of stretch in more concise terms than here and with annotated
photos. It then links to the relevant posts in this blog for those
readers who want the full, in-depth analysis:
Marco
thought of stretch theory, as it would be applied to comets in general,
and did so long before Rosetta arrived at 67P-CG. My first realisation
regarding the possibility of stretch was on seeing the first published
close-up of 67P on August 6th 2014.
A NOTE ON THE IMHOTEP ‘MISSING’ SLAB
The
crust-sliding across Imhotep is so extensive that it calls into
question the existence of the Imhotep missing slab that was described in
Part 13. There is clearly a large area that appears to have gone
missing, what the OSIRIS team morphology papers refer to as
mass-wasting. Even the Rosetta and OSIRIS teams believe it has eroded
away via sublimation erosion.
The
sliding crust pieces described in this overview appear to zip back up
quite nicely, and possibly negate the need to invoke a missing slab.
There doesn’t seem to be a vast chunk that’s still missing but that
doesn’t preclude smaller pieces flying off.
The
Imhotep slab was said to have been lost through going into negative g
via spin-up and been released when its tangential velocity was above 0.8
metres per second. That would be the comet’s escape velocity and would
be achieved at a 2.5- to 3-hour rotation period. If the slab didn’t need
to escape but is in fact the crust that slid back on Imhotep then it’s
likely that the rotation period was somewhat under this value, leaving
the crust weightless and able to slide around while it was weightless.
The weightless rotation period would be root 2 times the escape velocity
rotation. That’s 1.41 x 2.5 hours or 1.41 x 3 hrs. So say 4.2 hours.
However,
it still appears that a slab is missing from Hatmehit and there appears
to be missing (not slid) material at Anubis and the south pole. The
only way for that material to be missing is for it to have departed the
comet at above 0.8 m/sec. So we’re back to the faster spin-up again but
with Imhotep not losing a slab. Like the slab A extension (Part 23) and
the three sink holes (part 32) this paradox will probably get resolved
in due course.
PHOTO CREDITS:
Copyright ESA/Rosetta/NAVCAM – CC BY-SA IGO 3.0
To view a copy of this licence please visit:
Credit: ESA/Rosetta/MPS for OSIRIS Team MPS/UPD/LAM/IAA/SSO/INTA/UPM/DASP/IDA
All dotted annotations by Scute1133.